Are you familiar with the wifi range extenders? If not then in this blog we will let you know in detail. A WiFi range extender is a networking hardware device that is able to extend the range of your home WiFi network. After you finish the Netgear wifi extender setup at your home, office, or anywhere, it will eliminate all the dead spots (areas with no internet) and turn it into fun spots where you can use and enjoy the internet services. WiFi extenders are capable of increasing the WiFi coverage area. After reading and understanding this blog, you will be able to do the wifi extender setup at your place.
Which extender should I buy?
There are many brands in the market that manufacture wifi extenders. For a new user, it is very hard to choose and buy the right and trusted brand of extender. Here are the names of some trusted brands for the extenders that are most demanding nowadays:
- Netgear.
- Linksys.
- Wavlink.
You can buy any of them as per your choice and budget. But we will recommend you buy a Netgear or Wavlink extender because these two brands are the most demanding extenders because of their reliability, versatility, and performance as well.
Netgear wifi extender setup
Netgear wifi extenders are plug-and-play networking devices which extend the range of your existing wifi network. Mostly the Netgear wifi extender setup can be done in two ways which are as follows:
- Manual setup (Web browser setup).
- Wireless protected setup (WPS).
Netgear wifi extender setup by manual method | EX2700
Follow the given steps in order to complete the Netgear wifi extender setup:
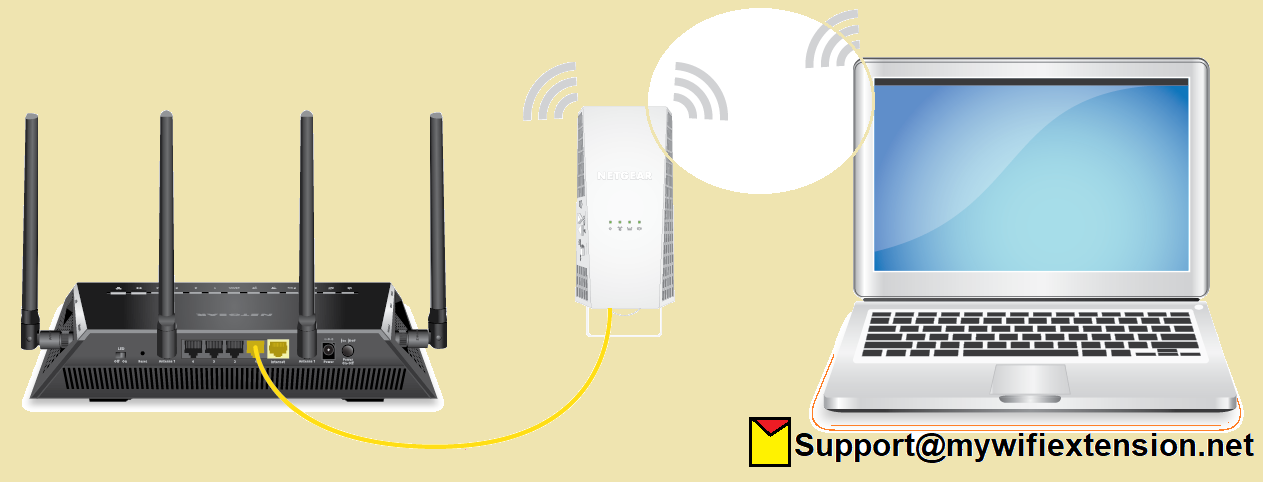
- First of all unbox your Netgear EX2700 extender and turn it on.
- Make sure that your EX2700 should be placed within 8-10 ft to your home router.
- Now get on a smart device and open a web browser of the latest version as per your choice.
- Type www.mywifiext.net or 192.168.1.250 on the address bar available at the top of your browser.
- Now you are at the Netgear installation assistant page.
- Here you will have to follow the on screen instructions in order to complete the wifi extender setup process after entering the username and password.
That’s how you can perform the Netgear EX2700 setup by web browser setup. If you face any trouble with the Netgear wifi extender setup, then in the next blog we will let you know about another way to setup your extender, which is the wireless protected setup (WPS).
Netgear EX2700 setup by WPS method
Wireless protected setup (WPS) is the easy and quick method to setup a Netgear EX2700 range extender. This process can be done within two minutes only. Let’s see how?
Follow the given tips in order to do Netgear EX2700 setup by WPS method:
- Make your Netgear EX2700 turned on.
- It should be placed in the same room as your home router.
- Press the WPS button on your N300.
- Now press the same WPS button on your home router as well.
- Once it gives three stable green lights that means the wifi extender setup process has been successfully done.
In case you are still having trouble setting up your extender, feel free to contact our professional technicians.
Wavlink extender setup | AC1200
Here are the steps for Wavlink AC1200 setup:
- Turn on your Wavlink AC1200 after unpacking it.
- Wait for a solid green light on the power LED after pressing the power button.
- Remember to keep the booster close to the router..
- Open any web browser and type Ap.setup into the address bar, then press the enter key.
- To log in, enter your personal information.
- Follow the steps to complete the installation.
- You can now disconnect your repeater and relocate it to your new site.
That’s how you can manually configure your Wavlink AC1200. Let’s go on to the (WPS) setup if the manual wifi extender setup isn’t working for you.
Wavlink AC1200 WPS setup
Let’s have a look at another approach for establishing your Wavlink repeater, the WPS method, which is said to be the quickest and easiest. You will be able to set up your extender in less than two minutes after completing the Wavlink AC1200 setup through WPS technique. You will not be required to provide a login, password, or SSID. Let’s take a closer look at how the WPS method works.
The instructions for setting up the Wavlink AC1200 using the WPS method are as follows:
- Switch on the Wavlink AC1200.
- Make sure it’s in close proximity to the home router.
- On your booster, press the WPS button.
- Now, on your home router, push the same WPS button.
- When it flashes three stable green lights, you’ve properly configured your repeater.
- You can unhook the repeater and relocate it wherever you choose.
This is how you set up the Wavlink AC1200 using the WPS method.