The Netgear AC2200 Setup improves the range and coverage of your existing network while offering dual-band WiFi speeds of up to 750 Mbps. The Netgear AC2200 WiFi Extender assists in extending the range of your WiFi network, increasing its speed, and minimizing interference. You can turn the dead zones in your house into entertaining areas after you setup netgear extender.
Follow the instructions below to set up a Netgear AC2200 Extender:
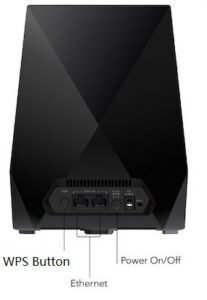
- Turn on the Netgear AC2200 by plugging it into an electrical outlet.
- Remain patient until the power LED has fully turned green.
- Use an Ethernet wire to link the extender to your current router.
- On the web browser, type mywifiext.net and press Enter.
- The Netgear AC2200 login page will appear.
- Log In after entering your default login information.
- Choose the WiFi network that you want to expand now.
- Complete the Netgear AC2200 Setup by following the on-screen directions.
We trust the above instructions will help you configure your AC2200 Netgear WiFi range extender. Contact our specialists if you run into trouble at any point.

Netgear AC2200 Setup via WPS Method
Here are the steps for Netgear AC2200 Setup using the WPS method:
- Plug in your extender near your router and power it on.
- once you notice the green extender power LED light.
- Press the WPS button on both your router and the booster.
- Avoid unplugging or switching off your device if the light is blinking.
- If the Netgear AC2200 has been successfully connected to your main router. On the wireless extender, the power, WPS, and device lights will all be solid green.
The Netgear AC2200 setup with WPS is finished.You can now move your extender to a different position and enjoy online browsing however you like.
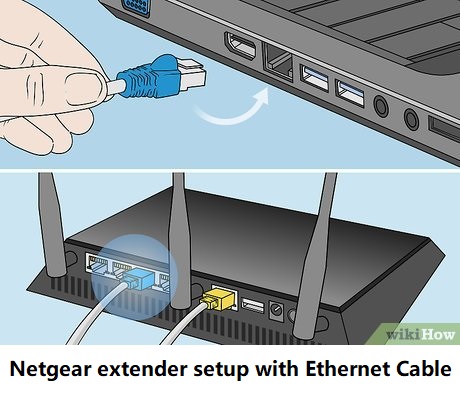
How do I Setup Netgear AC2200 with an Ethernet cable?
To install a Netgear AC2200 extender using an Ethernet cable, follow these steps:
- Connect the AC2200 extender to a power outlet and turn it on.
- Use an Ethernet cable to connect the extender to your computer or device.
- Go to “www.mywifiext.net” in the address bar of a web browser after it has been opened.
- The Netgear Nighthawk X4 AC2200 setup wizard may be found on the screen.
- When asked, select “Ethernet”.
- From the list, pick the Wi-Fi network that is already in use.
- Enter your Wi-Fi network password and click “Next.”
- Customize extender settings if desired, then click “Next.”
- Place the extender in an optimal location and ensure the Ethernet cable is connected.
- Reconnect your devices to the extended network.
Your Netgear AC2200 extender is now installed using an Ethernet cable for improved Wi-Fi coverage.
Netgear AC2200 Extender Firmware Update
Have you noticed any problems with your extender or odd behavior? If so, you need to update to the most recent netgear provided firmware version. After updating the Netgear AC2200 firmware on your booster, you will have access to the newest features and security patches that will help you optimize the functionality of your AC2200 and address any faults.
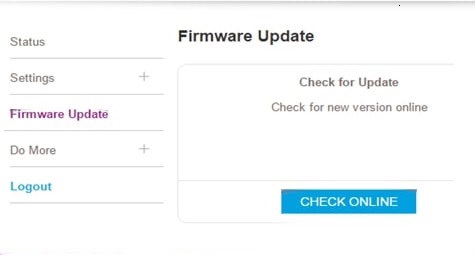
To update the firmware on your Netgear AC2200, follow these steps:
- Turn on your Netgear AC2200 after plugging it into a power outlet.
- Place the current router and the extender next to one another.
- Use any web browser to access mywifiext net login page.
- Enter your username, passphrase, and SSID to log in.
- Click on the firmware upgrade option after choosing the settings option.
- Do not disconnect your AC2200 while the upgrade is running.
You can upgrade your Netgear AC2200’s firmware to the most recent version by following these instructions. We’ll go over how to execute a factory reset on the Netgear wifi extender below.
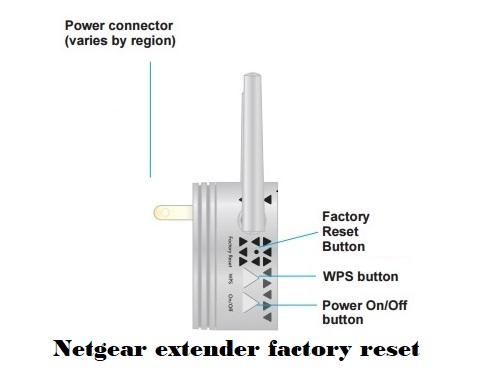
How Do I reset the Netgear AC2200 Extender?
You can adhere to these methods to reset a Netgear AC2200 extender:
- Locate the Reset button on the extender.
- It’s usually a small hole labeled “Reset.”
- Insert a paperclip or a similar tool into the Reset hole and hold it down for about 10 seconds.
- Release the Reset button.
- The extender will restart and return to its factory settings.
Remember that resetting your extender will erase any customized settings, so you’ll need to reconfigure it afterward. You can contact us by calling our toll-free number or via live chat if you need assistance with the Netgear Nighthawk X4 AC2200 setup, update, or reset process.
Common issues during Netgear AC2200 Setup
Having issues during the Netgear AC2200 Setup? Here are some common Issues:
- Unable to Change the Netgear AC2200 Extender SSID.
- Netgear AC2200 Extender Keeps Losing Internet.
- Netgear Extender Showing Blinking Power LED.
- Can’t login to AC2200 extender.
- Netgear Extender is not functioning properly.
- Lost configuration CD.
- The wifi Extender default web url is not working.
- Netgear Extender disconnected from the network.
- Can’t Access mywifiext.net.
- Netgear Extender is connected but there is no internet connection.
None of the aforementioned Common issues tips resolved your issues? Don’t panic. Just contact us, and we’ll fix your Netgear AC2200 setup issues.
Troubleshooting Tips for Netgear AC2200 Setup
Follow the given steps to solve the issues related to the Netgear AC2200 Setup:
- Ensure the extender is positioned within router range for a strong signal.
- If the setup page doesn’t load, try a different browser.
- Verify Wi-Fi password accuracy during setup.
- Confirm connecting to your desired network.
- Press both buttons within 2 minutes for successful pairing.
- Keep extender firmware up to date.
- Optimize speed by adjusting Wi-Fi channels.
- Try moving the extender for better coverage.
- Ensure the extender is powered and properly plugged in.
- Reboot devices after setup for synchronization.
There is no cause for concern. Simply contact our professionals, and they’ll assist you in resolving your Netgear AC2200 wifi extender Setup problems.