Nowadays, as technology advances, customers may easily connect their WiFi routers and extenders to any device. If you wish to set up your WiFi range extender using a Windows 10 PC, this instruction will be quite useful. We’ll walk you through each step of the Netgear Genie Setup process on a Windows 10 PC. Let’s get started.
In this tutorial, we’ll look at how to perform Netgear EX2800 setup on Windows 10. However, the methods apply to any Netgear extender model. Since the process of setting up all Netgear WiFi range extenders is the same, if you are having problems completing the process, please contact our technical specialists for immediate assistance.
Netgear Genie Setup with Windows 10 PC
Once you have finished unwrapping the EX2800 extender, you may begin the Netgear Genie setup by following the instructions outlined below:
- Connect the antennae of your EX2800 range extender to the specified ports.
- Plug the item into a wall socket to power it on.
Quick Tip: Make sure the socket you chose for your extender provides a consistent and reliable power supply. Also, ensure that it is close to the location where your home WiFi router is already configured.
- Now, connect the EX2800 range extender to your home router using an Ethernet connection. Although both devices can be connected wirelessly, it is advised that you choose a cable connection to avoid connectivity issues during the Genie setup.
- After that, boot up your Windows 10 PC and launch a web browser.
Note: Netgear Genie setup can be performed in any web browser. However, the one you select must be upgraded to the most recent software version.
- Type www.mywifiext.net into your internet browser’s address/URL bar and press the Enter key.
- You will then be sent to the log-in page for your EX2800 extender.
- To get here, you’ll need the default credentials for your extender.
- If you don’t know the admin details, consult the manual that came with your EX2800 range extender.
- Check the manual’s details and enter the login and password into the corresponding fields.
- Once completed, click the Log in button to launch the Netgear Genie smart setup procedure.
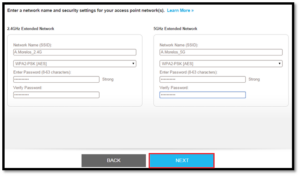
- Now, navigate to the Settings area of your EX2800 extender and look for the list of all available WiFi networks.
- You must select a network name that matches the name of your router’s network.
- Proceed by entering your device’s SSID i.e. Netgear_Ext.
- Some notifications will show on the screen of your Windows 10 machine.
- Follow all of the steps to complete the Netgear Genie setup process.
- This is how to set up your Genie gadget on a Windows 10 PC.
To summarize
If you do not want any interruptions while finishing the Genie setup, it is recommended that you use a Windows 10 PC free of malware infestations or dangerous content. Also, when performing the Netgear Genie setup, temporarily disable any firewall or ad-blocking apps on your PC.
Here’s hoping that by following the steps outlined in the guide above, you’ll be able to complete your Genie’s setup procedure with ease. If you need assistance with the Netgear Genie setup process, please contact our technical support professionals.