You should read this page if your Netgear wifi extender supports the Smart Connect feature. Everything you require to activate the Netgear smart connect feature on your wifi equipment has been covered. So let’s get started right away.
What is Netgear Smart Connect, exactly?
You may balance the 5GHz connection over two bands with the help of the Netgear smart connect feature. By selecting the proper radio frequency, your Netgear wireless range extender will give you lightning-fast and lag-free WiFi performance.
Helpful: You need to use the same network name (SSID) and password for both radio bands in order to enable the Smart Connect feature. Let’s now discuss the specifics of setting up Netgear extender to enable Netgear Smart connect.
Tips to activate Netgear smart connect feature on my Netgear wifi extender
Switch the Netgear wifi extender on.
Insert your wifi range extender into a wall socket to start the Netgear smart connect setup process. Press and hold the Power button on your device until the LED light turns solid green.
Note: If not, you can experience technical issues. It is advised that you restart your wireless range extender and enable the smart connect feature again if the LED on the device does not turn green.
Connect your WiFi-capable devices.
Once the power LED on your Netgear wireless range extender turns green, connect it to your home network via an Ethernet connection. If you’d like, you can also wirelessly connect your devices.
Note: Make sure the Ethernet cable you are using to connect your devices is in good condition.
Select mywifiext.net.
The next action is to switch on your computer and open a modern web browser. In the internet bar’s URL bar, type Netgear extender’s default web address and hit the Enter key.
Caution: Don’t type the browser’s default URL in the address box.
If you are having trouble utilizing mywifiext.net to log in to your Netgear wireless range extender, it is advised that you contact our experts for assistance. They most likely will be able to help you.
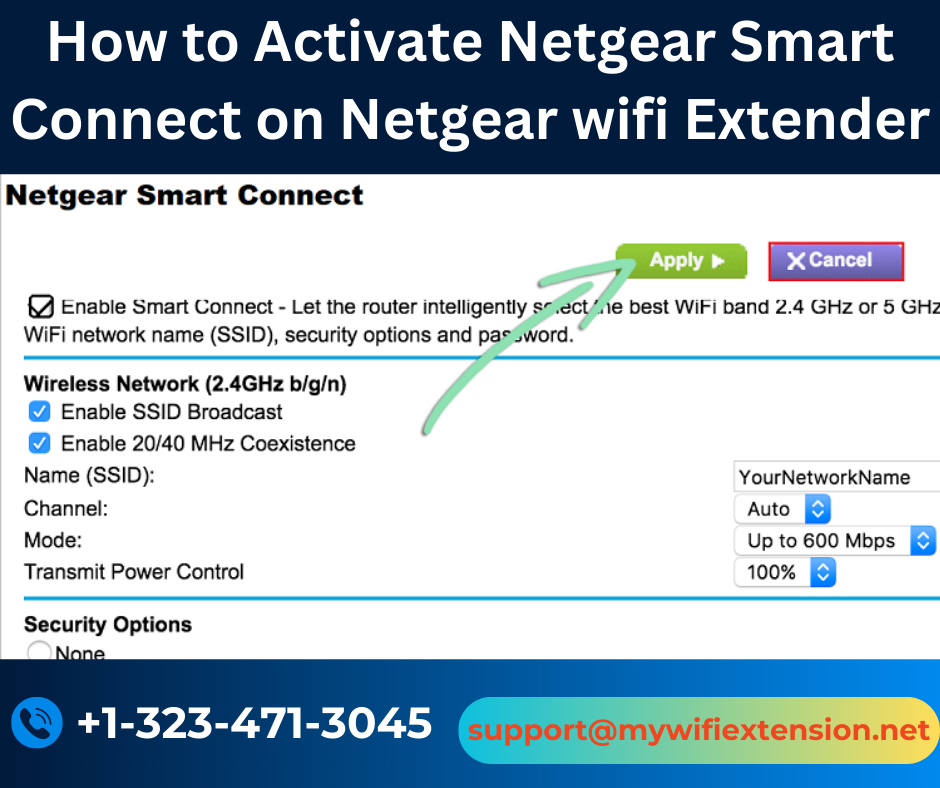
Switch on the Netgear smart connect.
You can access the Netgear extender administrative page by hitting the Enter key. When prompted, enter the default username and password and click Log In to proceed.
Note: Refer to the user manual if you are unsure of the default login information for your Netgear wireless range extender.
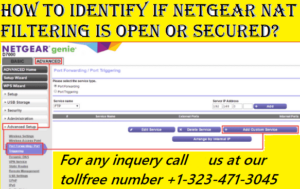
Once the Netgear Genie smart setup wizard opens, select Settings and adhere to the guidelines provided below:
- Go to the Wireless Settings.
- The page with wireless settings opens.
- To activate Netgear smart connect, select the ‘Yes’ radio button.
- Press the Apply button.
- After some time, the changes you’ve made on your device will be preserved.
- You may quickly activate the Netgear smart connect function on your wireless range extender by following these instructions.
Note: You must first register a Netgear account in order to use the Nighthawk app to enable smart connect on your Netgear extender.
Finishing up
How to enable Netgear smart connect on your Netgear wifi extender was covered in this article. Please get in touch with our technical experts if, even after following the above instructions, you are still unable to activate this feature.